Davide Capponi photography

Photographic art by Davide Capponi

Posts tagged ‘naviglio grande’

Azorean sunset reloaded

Azorean sunset reloaded

This is an alternate edit of my photo Azorean sunset. This has been shot with my iPhone 4s.

The app used to shot the image was Pro HDR, cropping and adjustments were done using Snapseed, further editing was done using Dynamic Light, VintageSceneImage Blender, iColorama and PhotoToaster.

The howling mill

The howling mill

This is an alternate edit of my photo Windmill in Pico. This has been shot with my iPhone 4s.

The app used to shot the image was Pro HDR, cropping and adjustments were done using Snapseed, further editing was done using Dynamic Light, VintageSceneImage Blender, iColorama and PhotoToaster.

2:22 3/4

2.22 34

This is a church in Abbiategrasso (Italy). This has been shot with my iPhone 4s.

The app used to shot the image was Pro HDR, cropping and adjustments were done using Snapseed, further editing was done using Dynamic Light, VintageScene, Decim8, Image Blender  and PhotoToaster.

Imagine

Imagine

This is the Naviglio channel in Abbiategrasso (Italy). This has been shot with my iPhone 4s.

The app used to shot the image was Pro HDR, cropping and adjustments were done using Snapseed, further editing was done using Dynamic Light, VintageSceneImage Blender, Modern Grunge and PhotoToaster.

Reflection on Naviglio Grande

This is the reflection of a church on the Naviglio Grande channel in Milano. This has been shot with my iPhone 3gs. The app used to shot the image was HDR Pro, cropping and adjustments were done using Snapseed, further editing was done using Dynamic Light, Pic Grunger and PhotoToaster.

Naviglio

This is a view on the Naviglio channel in Gaggiano, near Milano. This has been shot with my iPhone 4s.  The app used to shot the image was Pro HDR, cropping and adjustments were done using Snapseed, further editing was done using Dynamic Light, ShockMyPic, Blur FX and PhotoToaster.

City House

This is a house in Milano. This has been shot with my iPhone 3gs.  The app used to shot the image was Pro HDR, cropping and adjustments were done using Snapseed, further editing was done using Dynamic Light, Pic Grunger and PhotoToaster.

Time to go

This is a view of Milano. This has been shot with my iPhone 4s.  The app used to shot the image was Pro HDR, cropping and adjustments were done using Snapseed, further editing was done using Dynamic Light, Pic Grunger and PhotoToaster.

There must be an angel…

This is a statue on a church facade in Abbiategrasso. This has been shot with my iPhone 4s.  The app used to shot the image was Pro HDR, cropping and adjustments were done using Snapseed, further editing was done using Dynamic Light, Pic Grunger and PhotoToaster.

Milano housing

This is a view on of Milano. This has been shot with my iPhone 4s.  The app used to shot the image was Pro HDR, cropping and adjustments were done using Snapseed, further editing was done using Dynamic Light, Pic Grunger and PhotoToaster.

Naviglio crossing

This is a view on the Naviglio channel in Milano. This has been shot with my iPhone 4s.  The app used to shot the image was Pro HDR, cropping and adjustments were done using Snapseed, further editing was done using Dynamic Light, Pic Grunger and PhotoToaster.

Naviglio Grande

This is a reflection on the channel Naviglio Grande in Milano. This has been shot with my iPhone 3gs. The app used to shot the image was Qbro, cropping and adjustments were done using Snapseed, further editing was done using Dynamic Light, Pic Grunger and PhotoToaster.

Lunch break on Naviglio Grande

This is a trattoria on the channel Naviglio Grande in Milano. This has been shot with my iPhone 3gs. The app used to shot the image was Qbro, cropping and adjustments were done using Snapseed, further editing was done using Dynamic Light, Pic Grunger and PhotoToaster.

Abandoned house in Barrio Alto

This is an abandoned house  in the city of Lisbon, Portugal. This has been shot with my iPhone 3gs. The app used to shot the image was HDR Pro, cropping and adjustments were done using Snapseed, further editing was done using Dynamic Light, Pic Grunger and PhotoToaster.

On frozen water – the making of

Many of you have been asking to see the original shot before editing or the sequence of processing steps that brought to the posted image, and here it is.


1 – The raw shot

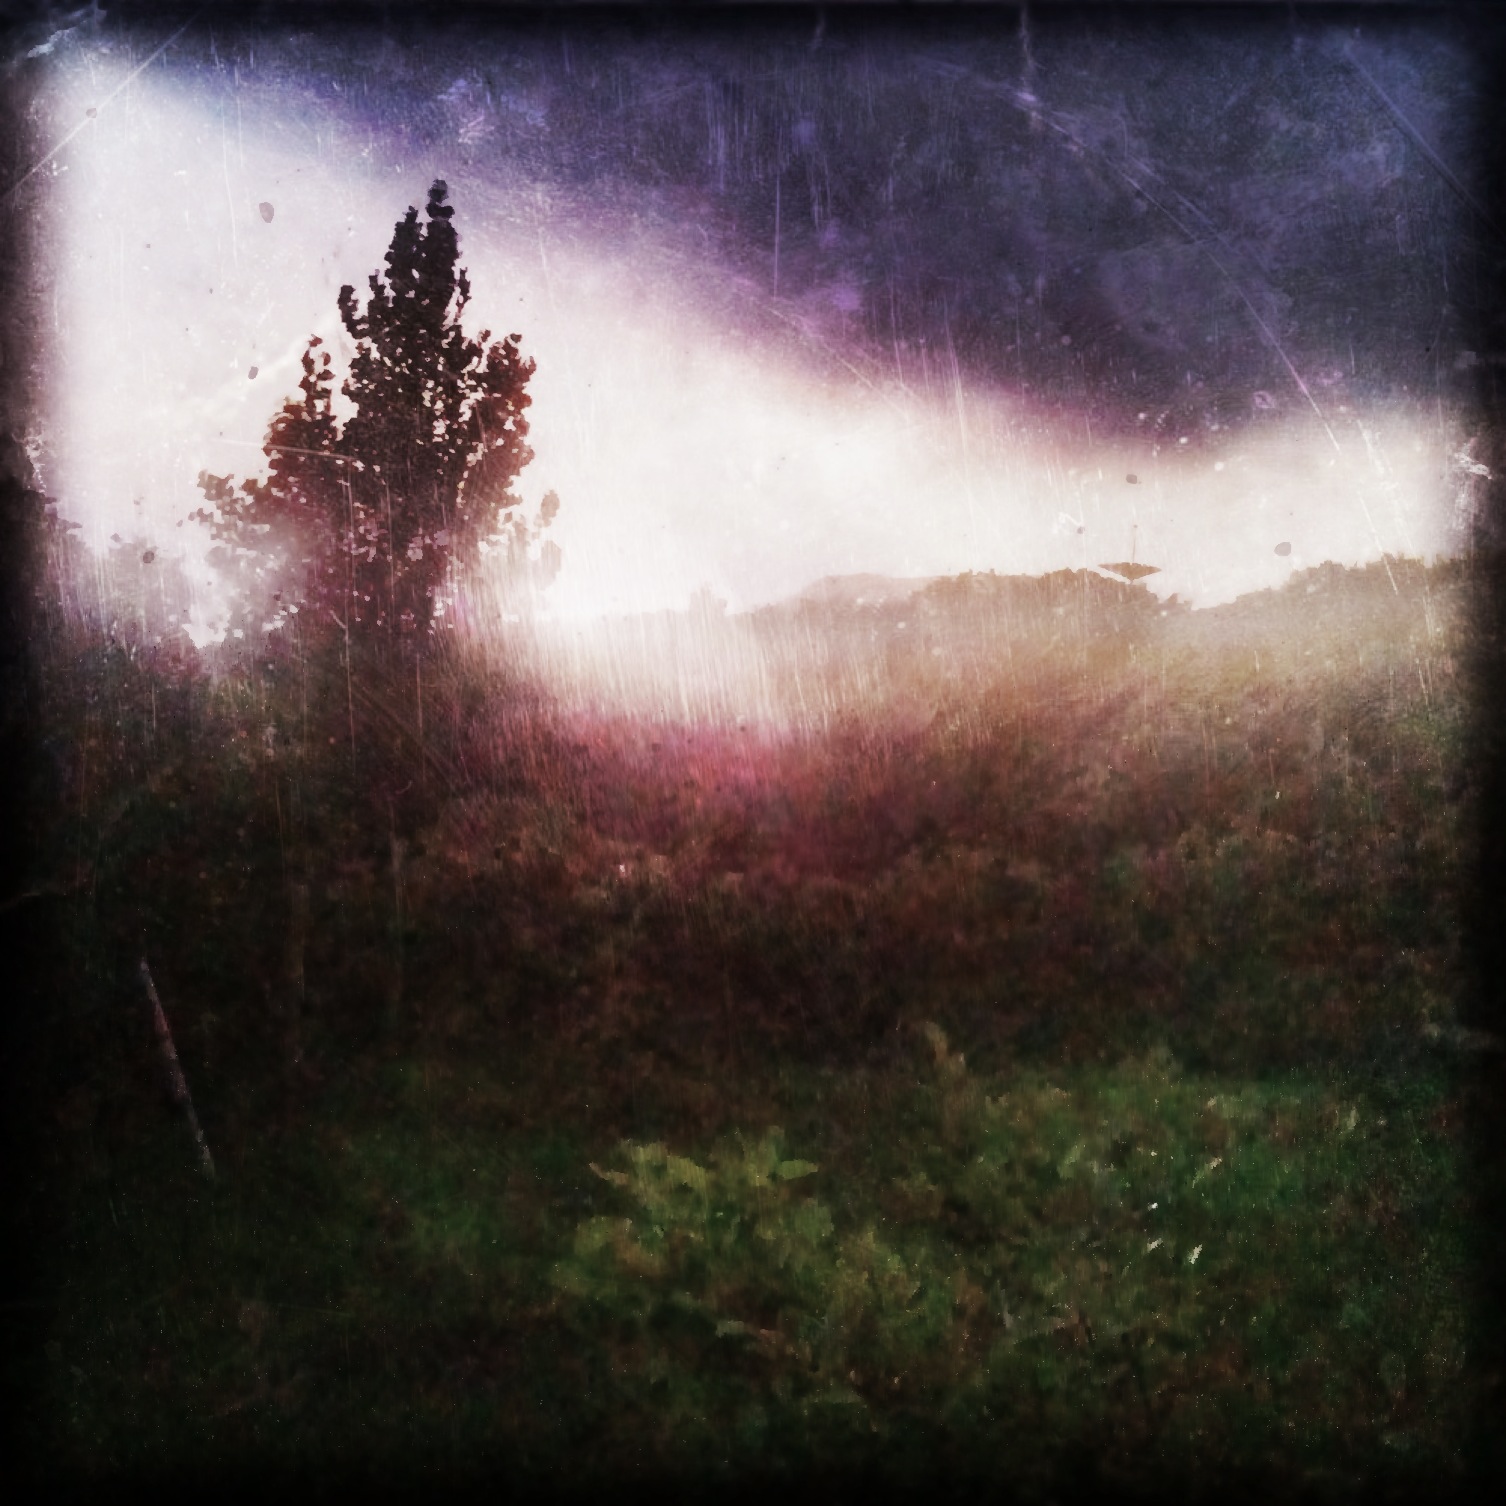
This is the starting shot, it was taken around 1 pm during lunch break on a cold day after snowfall, the weather was cloudy with some sunlight piercing the clouds.

There were seagulls flying on the Naviglio channel in Milano, so to capture them in flight, instead of shooting with HDR Pro app which is quite slow since it does take two shots to create the HDR effect, I used another shooting app called 6×6.  Throughout the shooting session I used an Olloclip wide lens, as can be easily seen by the curved line of the river bank.

Amongst the shots I took I chose this one because the flying seagull can be clearly seen and has a nice vignette of snow around.


2 – Cropping and basic tuning

I used Snapseed to crop the image so that the subject (the seagull)  was larger and better positioned.

After that I tuned contrast, brightness and saturation.


3 – Dynamic Light

To enhance and dramatize the image I used Dynamic Light, an app that applies many effects but mainly does a HDR-like effect.


4 – PicGrunger

PicGrunger applies textures to the image in the so-called “grunge” style. I chose warm textures for this image.


5 – Phototoaster

Phototoaster is a all-round editor that I find very good for final balancing and refining of the image. In this case I mainly corrected the color temperature of the image adding blue and red hues.

In many images my editing chain stops here, and the final image is ready.

Looking at the image, however, you will notice that after all this editing the seagull is almost lost in the image and does not catch the eye of the viewer.

There are different devices you can use to make a subject pop up in an image, for this shot I chose to enhance the image with an app called Rays.


6 – Rays

Rays enables you to add light rays effects to an image. In this case I chose to originate rays from the subject, the seagull.

Rays has however the downside of generating a misty overlay that reduces contrast and colors making the image somewhat dull.


7 – Final image – On frozen waters


To give back “punch“to the image I did some final adjustments to contrast, brightness and saturation with Snapseed.

And this brings us to the final image that you have seen in the previous post.

Hope you enjoyed this walkthrough, it was nice to go back with you at the steps I followed to create this image.